
In primary and revision Total Hip Arthroplasty (THA), the long-term survivorship of the acetabular component relies heavily on the precision of bone preparation, where millimeter-level deviations can lead to aseptic loosening, micro-motion, or dislocation. A mismatch between the power tool's output (torque and RPM) and the specific requirements of acetabular preparation often results in thermal osteonecrosis, inadequate press-fit margins, or poorly angled anchorage holes for cemented fixation. Orthopedic facilities face the ongoing challenge of selecting equipment that balances raw power with precise tactile feedback. Evaluating a hip surgery drill requires moving beyond basic specifications to understand how its output characteristics directly interface with variable angled guides, robotic-assisted platforms, and the distinct anatomical demands of both cemented and cementless cup positioning.
Output Calibration is Critical: Optimal acetabular preparation requires a drill capable of delivering high torque at low speeds for reaming, and precise, variable speeds for screw hole preparation without compromising bone viability.
Trajectory and Access Dictate Design: Compatibility with variable angled drill guides (accommodating 120° to 160° trajectories) is essential for accurate screw insertion in complex pelvic anatomies.
Anatomical Clearance Limits Error: Drill handpieces must be designed to clear anatomical landmarks and specific retractors—such as those placed inferior to the transverse acetabular ligament—to maintain line of sight and avoid torque dampening.
Workflow Sequence Matters: Modern robotic systems mandate an "acetabular-first" preparation workflow, requiring drills that seamlessly interface with automated tracking and real-time performance logging before femoral broaching begins.
Ergonomics Impact Outcomes: An ergonomic joint surgery drill reduces surgeon fatigue during repetitive reaming and drilling cycles, directly influencing the accuracy of the final cup positioning.
Achieving a true hemispherical construct is the primary objective during acetabular preparation. You need this specific geometry to maximize the contact area between the host bone and the implant. Preserving the subchondral bone bed provides the structural support necessary for the acetabular shell, which prevents early subsidence. Precise medialization of the cup optimizes joint center biomechanics and restores the natural center of rotation. We look for specific indicators of success during this phase, including uniform bleeding bone and a perfectly concentric cavity.
A direct biomechanical relationship exists between acetabular medialization and femoral offset compensation. When you medialize the acetabular component, you often must adjust the femoral offset to maintain proper abductor tension and leg length. A steady, vibration-free drill prevents inadvertent over-reaming of the medial wall. If you breach or excessively thin the medial wall, restoring these offset parameters becomes highly unpredictable. This increases the risk of impingement or instability post-operatively.
Evaluating drill performance requires strict baseline metrics. Sustained torque under load is an absolute requirement. The handpiece must drive large-diameter reamers through sclerotic bone without stalling or bogging down. Minimal vibration, known as runout, ensures the reamer cuts exactly where intended rather than creating an elliptical cavity. Trigger responsiveness allows you to modulate power instantly based on tactile feedback. The drill system fulfills a dual role: powering modular reamers for initial hemispherical preparation and driving smaller drill bits for supplemental screw fixation in the safe zones.
Engage the reamer at a low RPM before making contact with the bone to prevent skipping.
Apply steady, axial pressure directed toward the true floor of the acetabulum.
Monitor tactile feedback to detect changes in bone density, particularly when approaching the medial wall.
Release the trigger immediately if the reamer binds to prevent torque transfer to the pelvis.
Extract the reamer while it is still spinning slowly to clear debris from the cavity.
Different fixation philosophies demand distinct output profiles from the surgical drill. Cemented fixation relies on the mechanical interlock between bone cement and the cancellous bone bed. You must create clean, precise anchorage holes in the acetabulum to allow for pressurized cement introduction and the formation of strong cement pegs. The rotational speed during this phase must be carefully controlled. High speeds generate excessive friction, leading to thermal necrosis of the surrounding bone. This dead bone weakens the cement-bone interface and precipitates early loosening.
Cementless, or press-fit, fixation requires a completely different approach. The goal is to under-ream the acetabulum by 1 to 2 millimeters relative to the implant size. This creates a tight friction-fit that guarantees primary stability. This technique demands high-torque, low-speed output. The drill must power through dense bone steadily without chattering or seizing. Insufficient torque can cause the reamer to bind, potentially fracturing the anterior or posterior columns of the acetabulum. Consistent power delivery ensures an even cut, promoting optimal bone ingrowth.
Fixation Type | Primary Objective | Drill Output Requirement | Clinical Risk of Mismatch |
|---|---|---|---|
Cemented Fixation | Create anchorage holes for cement pegs | Moderate speed, precise trigger control | Thermal necrosis, weak cement interlock |
Cementless (Press-Fit) | Hemispherical under-reaming for primary stability | High torque, low speed (RPM) | Reamer stalling, column fracture, poor ingrowth |
Revision (Impaction Grafting) | Prepare host bone for graft incorporation | Variable speed, high tactile feedback | Graft displacement, inadequate host bone preparation |
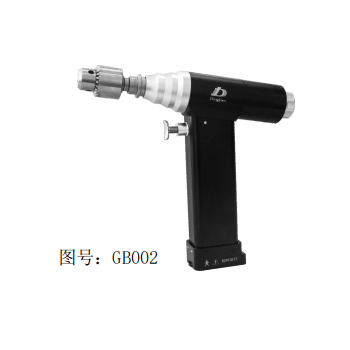
The relationship between rotations per minute (RPM) and bone thermal necrosis is a fundamental constraint in orthopedic surgery. Bone tissue is highly sensitive to heat. Temperatures exceeding 47°C for more than one minute cause irreversible osteonecrosis. Therefore, an acetabular preparation tool must deliver low-speed, high-torque settings for the reaming phase. This combination removes bone efficiently while keeping temperatures safely below the necrotic threshold. Conversely, drilling pilot holes for supplemental screws requires higher speeds to penetrate the cortical shell cleanly without skiving.
To accommodate these conflicting requirements, modern surgical drills utilize dual-trigger mechanisms or easily switchable gear systems. This allows you to transition seamlessly between the high-torque demands of reaming and the higher-speed requirements of pilot hole drilling without changing handpieces. Consistent power delivery across both modes is vital. Fluctuations in power can create an uneven bone bed. An uneven surface encourages fibrous tissue interposition rather than direct osseointegration, severely compromising the longevity of a cementless implant.
When evaluating torque, we look at the stall torque rating. A drill that stalls at 3 Nm will struggle with dense sclerotic bone, causing the reamer to chatter. A drill with a stall torque of 5 Nm or higher provides the sustained power needed to cut a smooth, continuous hemisphere. Speed control is equally important. The ability to feather the trigger and maintain a steady 250 RPM under load separates high-quality instruments from inadequate ones.
Accessing the acetabulum presents significant mechanical challenges, primarily due to the surrounding soft tissue envelope. You must navigate narrow corridors while avoiding impingement on neurovascular structures and musculature. When supplemental screw fixation is required, standard straight drill bits often cannot achieve the necessary trajectory to reach the safe zones, such as the posterosuperior quadrant of the ilium.
Drill handpieces must interface flawlessly with variable angled drill guides. These guides typically accommodate trajectories ranging from 120° to 160°. This range allows you to bypass soft tissue obstacles and direct screws into the thickest available bone. Secure locking mechanisms between the drill bit, the angled guide, and the handpiece are essential. Any toggle or play in this connection during angled insertion will result in an eccentric hole, reducing screw purchase and potentially compromising the entire acetabular construct.
Ergonomics in the operating room extend far beyond basic user comfort; they are a critical determinant of surgical accuracy. During a complex THA, you perform repetitive reaming and drilling cycles that strain the hands, wrists, and forearms. Fatigue directly degrades fine motor control. An ergonomic joint surgery drill mitigates this fatigue, ensuring you maintain the precise trajectory required for optimal cup positioning from the first reamer to the final screw.
Weight distribution and the center of gravity differ significantly between battery-operated and pneumatic systems. Battery systems offer unparalleled mobility by eliminating cords, but the battery pack can shift the center of gravity, requiring compensatory muscle exertion. Pneumatic systems are generally lighter in the hand but tether you to a console. Regardless of the power source, grip design and trigger sensitivity are paramount. A highly responsive trigger provides the tactile feedback necessary to sense changes in bone density, preventing catastrophic over-penetration of the medial wall during the final stages of reaming.
The spatial constraints of the acetabulum require meticulous retractor placement. For example, a sciatic nerve retractor or a sharp Homan retractor is frequently positioned just inferior to the posterior one-third of the transverse acetabular ligament. These retractors protect vital structures but simultaneously crowd the operative field. The physical footprint of the drill handpiece must be compact enough to operate within this confined space without colliding with the retractors.
Different surgical approaches impose unique line-of-sight challenges. The Anterior Supine approach often involves working through a smaller, more restrictive incision compared to the classic posterior approach. In these tissue-sparing techniques, a bulky drill handpiece can completely obscure your view of the acetabulum. Low-profile, curved, or offset attachments, along with extended drill bits, are necessary to maintain clear visibility. These specialized attachments allow you to reach the target anatomy while keeping the bulky motor housing outside the immediate visual field, all without compromising torque transfer.
Place the anterior retractor over the anterior wall to expose the anterior horn.
Position the inferior retractor beneath the transverse acetabular ligament.
Insert the posterior retractor carefully to protect the sciatic nerve.
Ensure the drill handpiece clears the handles of all retractors during the reaming arc.
The integration of surgical drills with robotic-arm-assisted platforms represents a major advancement in THA precision. Systems record anatomical landmarks and guide acetabular preparation based on a 3D pre-operative plan. This technology mandates an "acetabular preparation first" workflow. The drill must interface seamlessly with the robotic arm to complete the reaming phase accurately before you move on to femoral preparation and broaching.
Robotic systems utilize haptic boundaries to constrain the drill's movement. If you attempt to ream beyond the pre-operatively planned depth or angle, the system automatically modulates the drill's output or stops it entirely. This haptic feedback protects vital anatomical structures and prevents over-reaming. Furthermore, modern drill consoles share data with the robotic system, allowing for real-time intraoperative recording of reaming resistance and torque curves. This data provides objective verification of bone quality and preparation accuracy.
Patient-specific instrumentation (PSI) and specialized jigs are frequently utilized to guide acetabular preparation, particularly in complex revision cases or deformed anatomies. These jigs are designed based on pre-operative CT scans and fit precisely into the patient's unique bone geometry.
The tolerance requirements between the drill bit and the jig are exceptionally tight. If the drill bit fits loosely within the jig's guide cylinder, it can skive off the dense cortical bone, altering the intended trajectory. Accurate compatibility ensures the precise creation of cement pegs or screw trajectories, directly translating the pre-operative plan into intraoperative reality.
Procurement teams face a distinct trade-off when selecting battery-operated drill systems. High-voltage battery systems deliver the sustained torque necessary for dense bone preparation, but they inherently increase the overall weight of the handpiece. A heavier drill exacerbates surgeon fatigue during lengthy procedures. Conversely, lighter batteries may lack the sustained power required for aggressive reaming, leading to stalling and uneven bone cuts.
Operational risks also include battery degradation over time. Lithium-ion batteries lose capacity with repeated charging cycles. A degraded battery may show a full charge but fail to deliver consistent output during the most demanding phases of dense bone preparation. Facilities must implement strict battery lifecycle management protocols to ensure surgical drills perform reliably under load.
Surgical drills are subjected to harsh sterilization environments. Repeated autoclave cycles expose the internal motor components, seals, and gear assemblies to high heat and moisture. Over time, this exposure degrades lubricants and accelerates component wear, leading to increased friction and a gradual loss of torque.
Rigorous maintenance requirements are necessary to ensure the drill output remains calibrated to factory specifications. A drill that has lost its torque calibration may feel normal during free-running but will underperform when cutting bone. This gradual loss of power can compromise acetabular preparation, forcing you to apply excessive manual pressure, which increases the risk of slipping or fracturing the acetabular rim. Routine preventative maintenance and calibration checks are mandatory to mitigate this risk.
Component | Sterilization Impact | Maintenance Action |
|---|---|---|
Motor Bearings | Lubricant degradation from high heat | Annual factory lubrication and inspection |
Battery Contacts | Oxidation from moisture exposure | Monthly cleaning with approved solvents |
Gear Assembly | Increased friction and wear | Torque calibration check every 6 months |
Initiate a side-by-side clinical evaluation of short-listed drill systems to assess tactile feedback and torque consistency during simulated dense bone reaming.
Request comprehensive technical data sheets from manufacturers to compare torque-curve performance, battery degradation rates, and robotic compatibility.
Audit current sterilization and maintenance protocols to ensure they align with the manufacturer's recommendations for preserving long-term drill calibration.
Consult with the surgical team to evaluate the ergonomic impact of different handpiece designs, specifically focusing on weight distribution and line-of-sight clearance in tissue-sparing approaches.
A: Acetabular reaming requires low-speed, high-torque settings, typically ranging between 250 and 400 RPM. This range allows the reamer to cut dense sclerotic bone efficiently while keeping temperatures below the 47°C threshold, thereby preventing thermal necrosis and preserving the viability of the subchondral bone bed.
A: Insufficient torque causes the reamer to stall or chatter against dense bone. This creates an uneven, non-hemispherical cavity that compromises the press-fit margin. Poor preparation prevents accurate medialization and final cup alignment, which ultimately impacts the restoration of femoral offset and joint stability.
A: While many standard drills can power the necessary bits, compatibility depends on the handpiece profile. The drill must have a compact design or specific attachments that accommodate the 120° to 160° angles of the guide without impinging on surrounding soft tissue or retractors during insertion.
A: Robotic systems require a stable pelvic reference to track the reamer accurately. Preparing the acetabulum first ensures the pelvic array data remains undisturbed. The drill interfaces with the robot to complete this phase with haptic guidance before the femur is mobilized for broaching.
A: Repeated autoclave cycles expose internal gears and motors to extreme heat and moisture, degrading lubricants and wearing down seals. Over time, this increases internal friction, leading to a gradual loss of torque and RPM calibration, which can compromise cutting efficiency during surgery.


